Author
Syoker
@syoker
November 30, 2021
Guide to flash a Generic System Image (GSI) on the Motorola One Fusion | Astro

Syoker
@syoker
November 30, 2021
In this guide, I will show you how to flash a GSI ROM on your device. This process will format your device, so I recommend you to make a backup before.
All this is at your own risk, I'm not responsible for any damage caused to your device.
The Android SDK Platform Tools are a component of the Android SDK. They include tools that interact with the Android platform, such as adb, fastboot and systrace. These tools are required for Android app development, or if you want to unlock the bootloader of your device and update it with a new system image.
Download link - SDK Platform Tools
This contains the USB drivers so that the PC can recognize your device and work with it when it is in Bootloader or Fastbootd.
Download link - Motorola
You will need to download official firmware corresponding to your software channel for your device, NEVER DOWNLOAD A FIRMWARE FROM ANOTHER CHANNEL. To find out which firmware corresponds to your device, you need to look at the channel it belongs to in the settings app, under "About phone" in "Software Channel".
Download link - Mirrors Lolinet
If you have windows 8, 8.1 or 10, download this terminal from the Windows Store, as you will get a feature that you will need in this guide. Once you have obtained the terminal, configure it so that the default profile is the command prompt (CMD).
Download link - Microsoft Store
In this guide we will use USB debugging to access the bootloader mode, it is not necessary if you are already in bootloader mode or if you are going to access it in another way (with a buttons combination), but I recommend the way it is going to be shown in this guide. To enable USB debugging, you have to go to the settings app, in the "About phone" section under "Build number" and tap 7 times. Then, you have to access the "Developer options" in the settings app under "System" and enable "USB debugging".
You need to have unlocked the bootloader to be able to install a Custom Recovery on your device. If you haven't unlocked it yet, I'll leave you the link to the guide I made explaining step by step what you have to do.
Link of the guide - How to unlock the bootloader
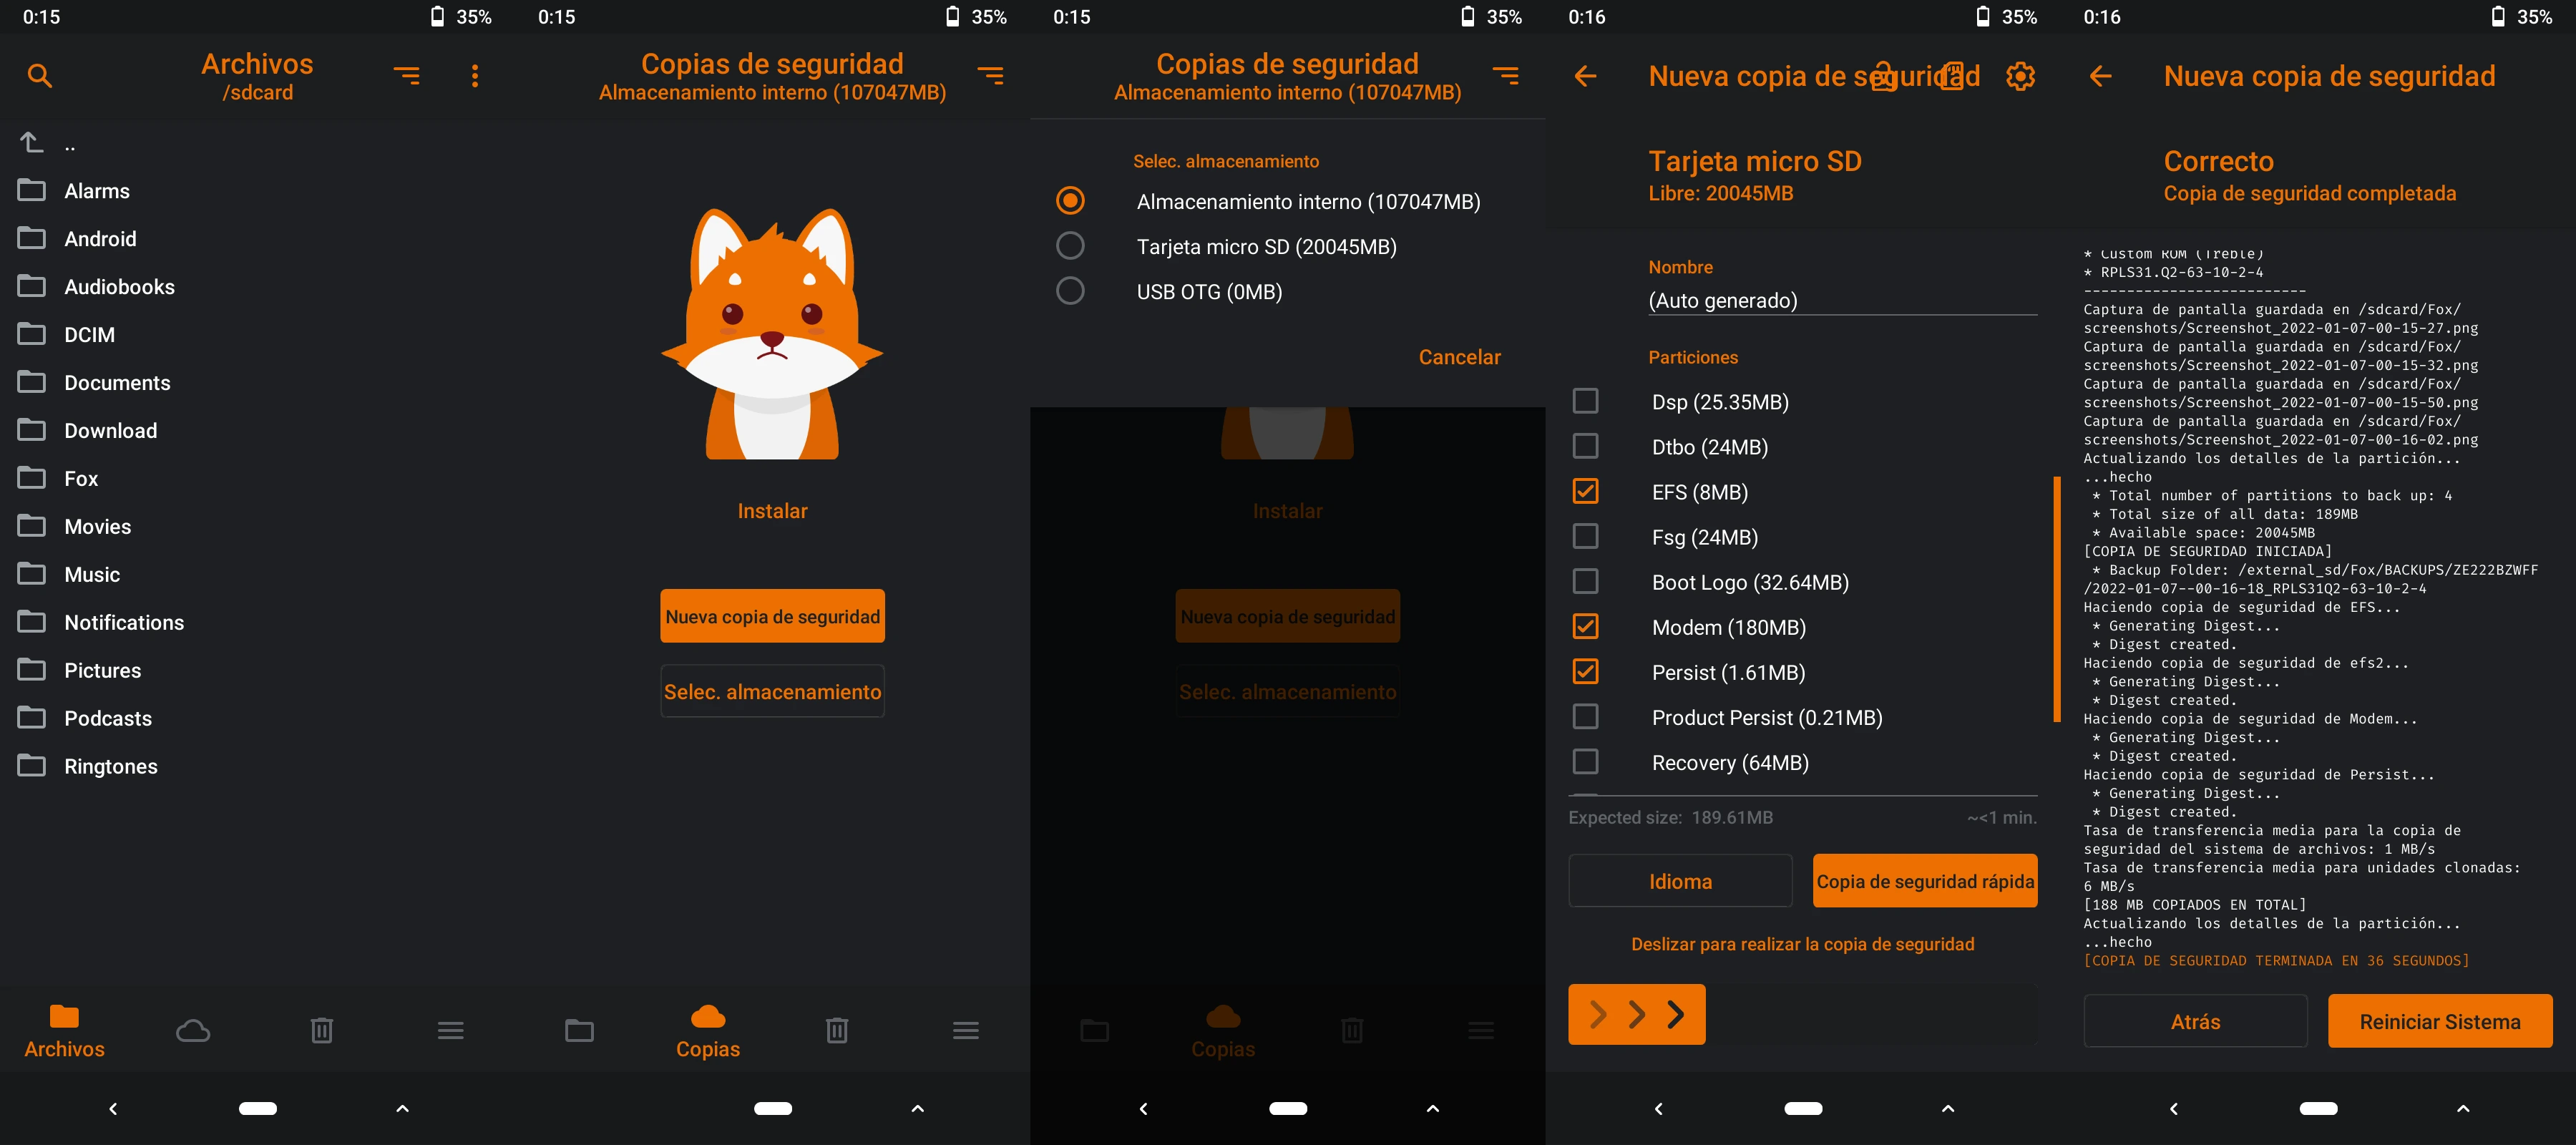
I recommend having a Custom Recovery and having ROOT on the device before installing a GSI, since GSI's have several visual problems on our device, which are fixed with Magisk modules. So, if you haven't installed a Custom Recovery yet, I'll leave you a link to a guide I made to install a Custom Recovery and also a .zip of a Magisk flashable by a Custom Recovery.
Link of the guide - How to flash a Custom Recovery
Link of Magisk - Magisk v25.2
GSIs have different variants for each type of architecture, partition system, whether they have gapps or are vanilla, and so on. Below I will show you how to distinguish each type of version.
Architectures:
- arm: 32-bit ARM architecture.
- a64: 32-bit ARM architecture with 64-bit binder.
- arm64: 64-bit ARM architecture.
Partition system:
- A: Devices with one partition (a-only).
- B: Devices with two partitions (A/B).
System version:
- g: Contains gapps (gapps).
- o: Contains GO version of gapps (go-gapps).
- v: Doesn't contain gapps (vanilla).
- f: Contains an open-source gapps system (floss).
Superuser:
- N: No superuser.
- S: Has PHH superuser (conflicts with Magisk).
- Z: Has Dynamic Superuser by Eremitein (conflicts with Magisk).
Build type:
- vndklite or lite: For devices with vendor vndklite or for a read-write system on normal devices.
- personal: Contains developer's personal mods.
- secure: With superuser removed.
Size of gapps (if there is):
- Normal: Normal amount of gapps.
- Slim: With a reduced amount of gapps.
To note, our device has an ARM64 architecture and an A/B partitioning system. Also note that it supports a maximum image size of 3.66GB.
The version I personally recommend would be arm64_BgN Normal.
Anyway, I'll leave you a link to a channel where we pass GSI ROMs that work on our device perfectly, the above is in case you want to try on your own GSI ROMs that are not in the channel.
Link of channel - Motorola One Fusion | Updates
Unzip the platform-tools folder you got from the Android Developers page, then unzip the official firmware file obtained from Mirrors Lolinet and also unzip the GSI file. Now move all the files from this folder to the platform-tools folder.
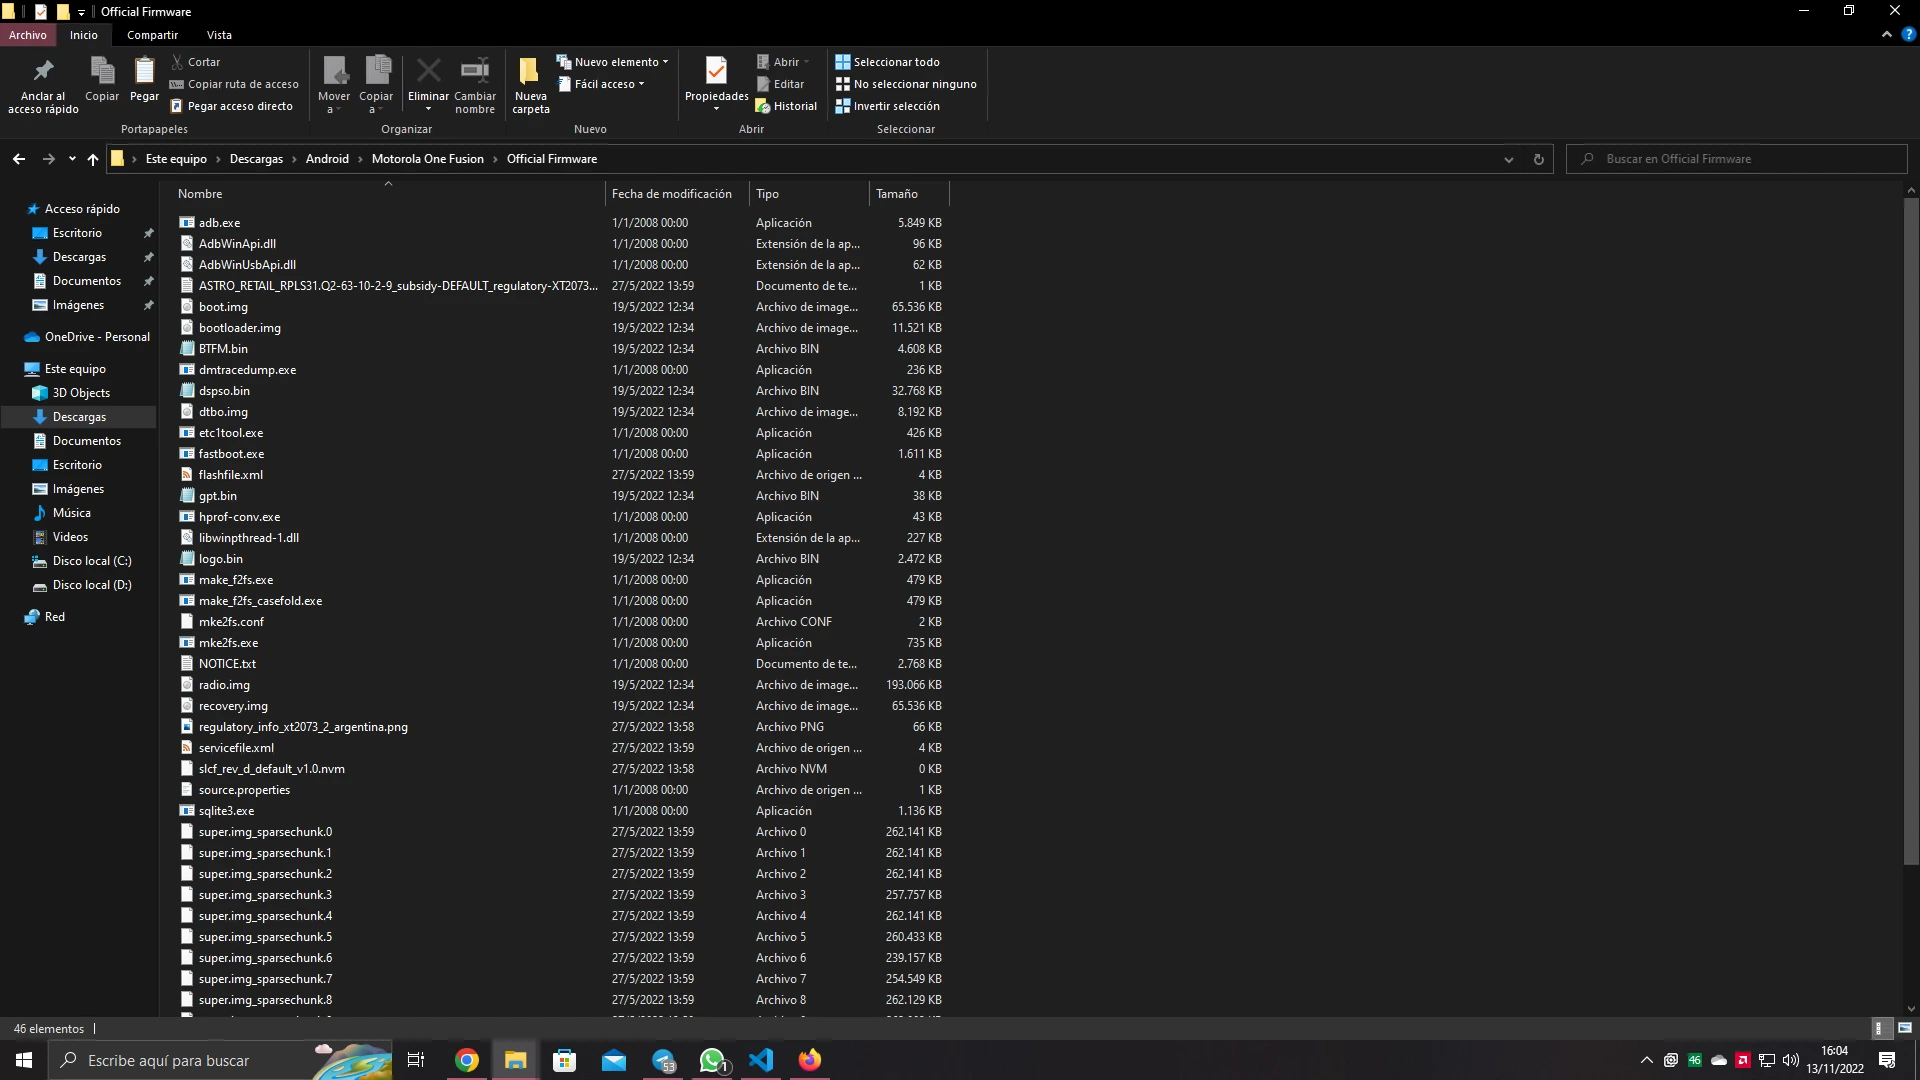
Folder example
If you have the Windows Terminal obtained from the Microsoft Store, simply open the CMD inside the folder by right-clicking on an empty part of the folder and selecting the "Open in Terminal" option.
Demonstration video
If you don't have the Windows Terminal, inside the folder in an empty space do shift + right click and select the option "Open in PowerShell window here", type cmd inside the window and press enter.
Demonstration video
Now connect the device to the PC and type into CMD
Terminal
adb devices
The device has to be powered on for this command to work, in case it is already in bootloader, type
fastboot devices.
If the console does not return
Terminal
List of devices attached
ZE222BZWFF device
then make sure you have the device properly connected, or that USB debugging is enabled.
Now proceed to reboot the device to go to fastbootd with the following command
Terminal
adb reboot fastboot
In case you are in bootloader, type
fastboot reboot fastboot.
You will know you are in fastbootd mode as it will boot into a screen that says "fastbootd" in big letters, or if you have a custom recovery, it will turn on the fastboot mode of the recovery.
Once in fastbootd, we will set the active partition of the device in the A with:
Terminal
fastboot --set-active=a
We will then proceed to disable the AVB with the command:
Terminal
fastboot --disable-verification flash vbmeta vbmeta.img
Once verified boot is disabled, we will delete the current system and then install the one we want with the following command:
Terminal
fastboot erase system
Now we will flash a special product (paste the downloaded file inside the platform-tools folder and don't change the name) that will give us more space for the GSI with the following command:
Terminal
fastboot flash product product_gsi.img
Now it's time to flash the GSI ROM, we will use the following command:
Terminal
fastboot flash system "system.img"
Where "system.img" is the name of the GSI ROM, without the quotes and with the ".img".
OPTIONAL: After installing the GSI, we will expand the partition size to have more space for the modules we will install.
ATTENTION: Please note that this command will cause bootloop if the device has not been previously rooted.
Terminal
fastboot resize-logical-partition system_a 380000000000
Now reboot to bootloader with
Terminal
fastboot reboot bootloader
to format the device with the following command
NOTA: If you skip this step, you may get a bootloop.
Terminal
fastboot -w
if that command doesn't work, you can use this other command
Terminal
fastboot erase userdata
Once the system has been formatted, boot into it with the following command
Terminal
fastboot reboot
Visual representation of the tip
To see the life of your eMMC (the internal storage) just run the command I'm going to leave you from Termux. You need to root your device.
Terminal
su -c cat /sys/class/mmc_host/mmc0/mmc0:0001/life_time
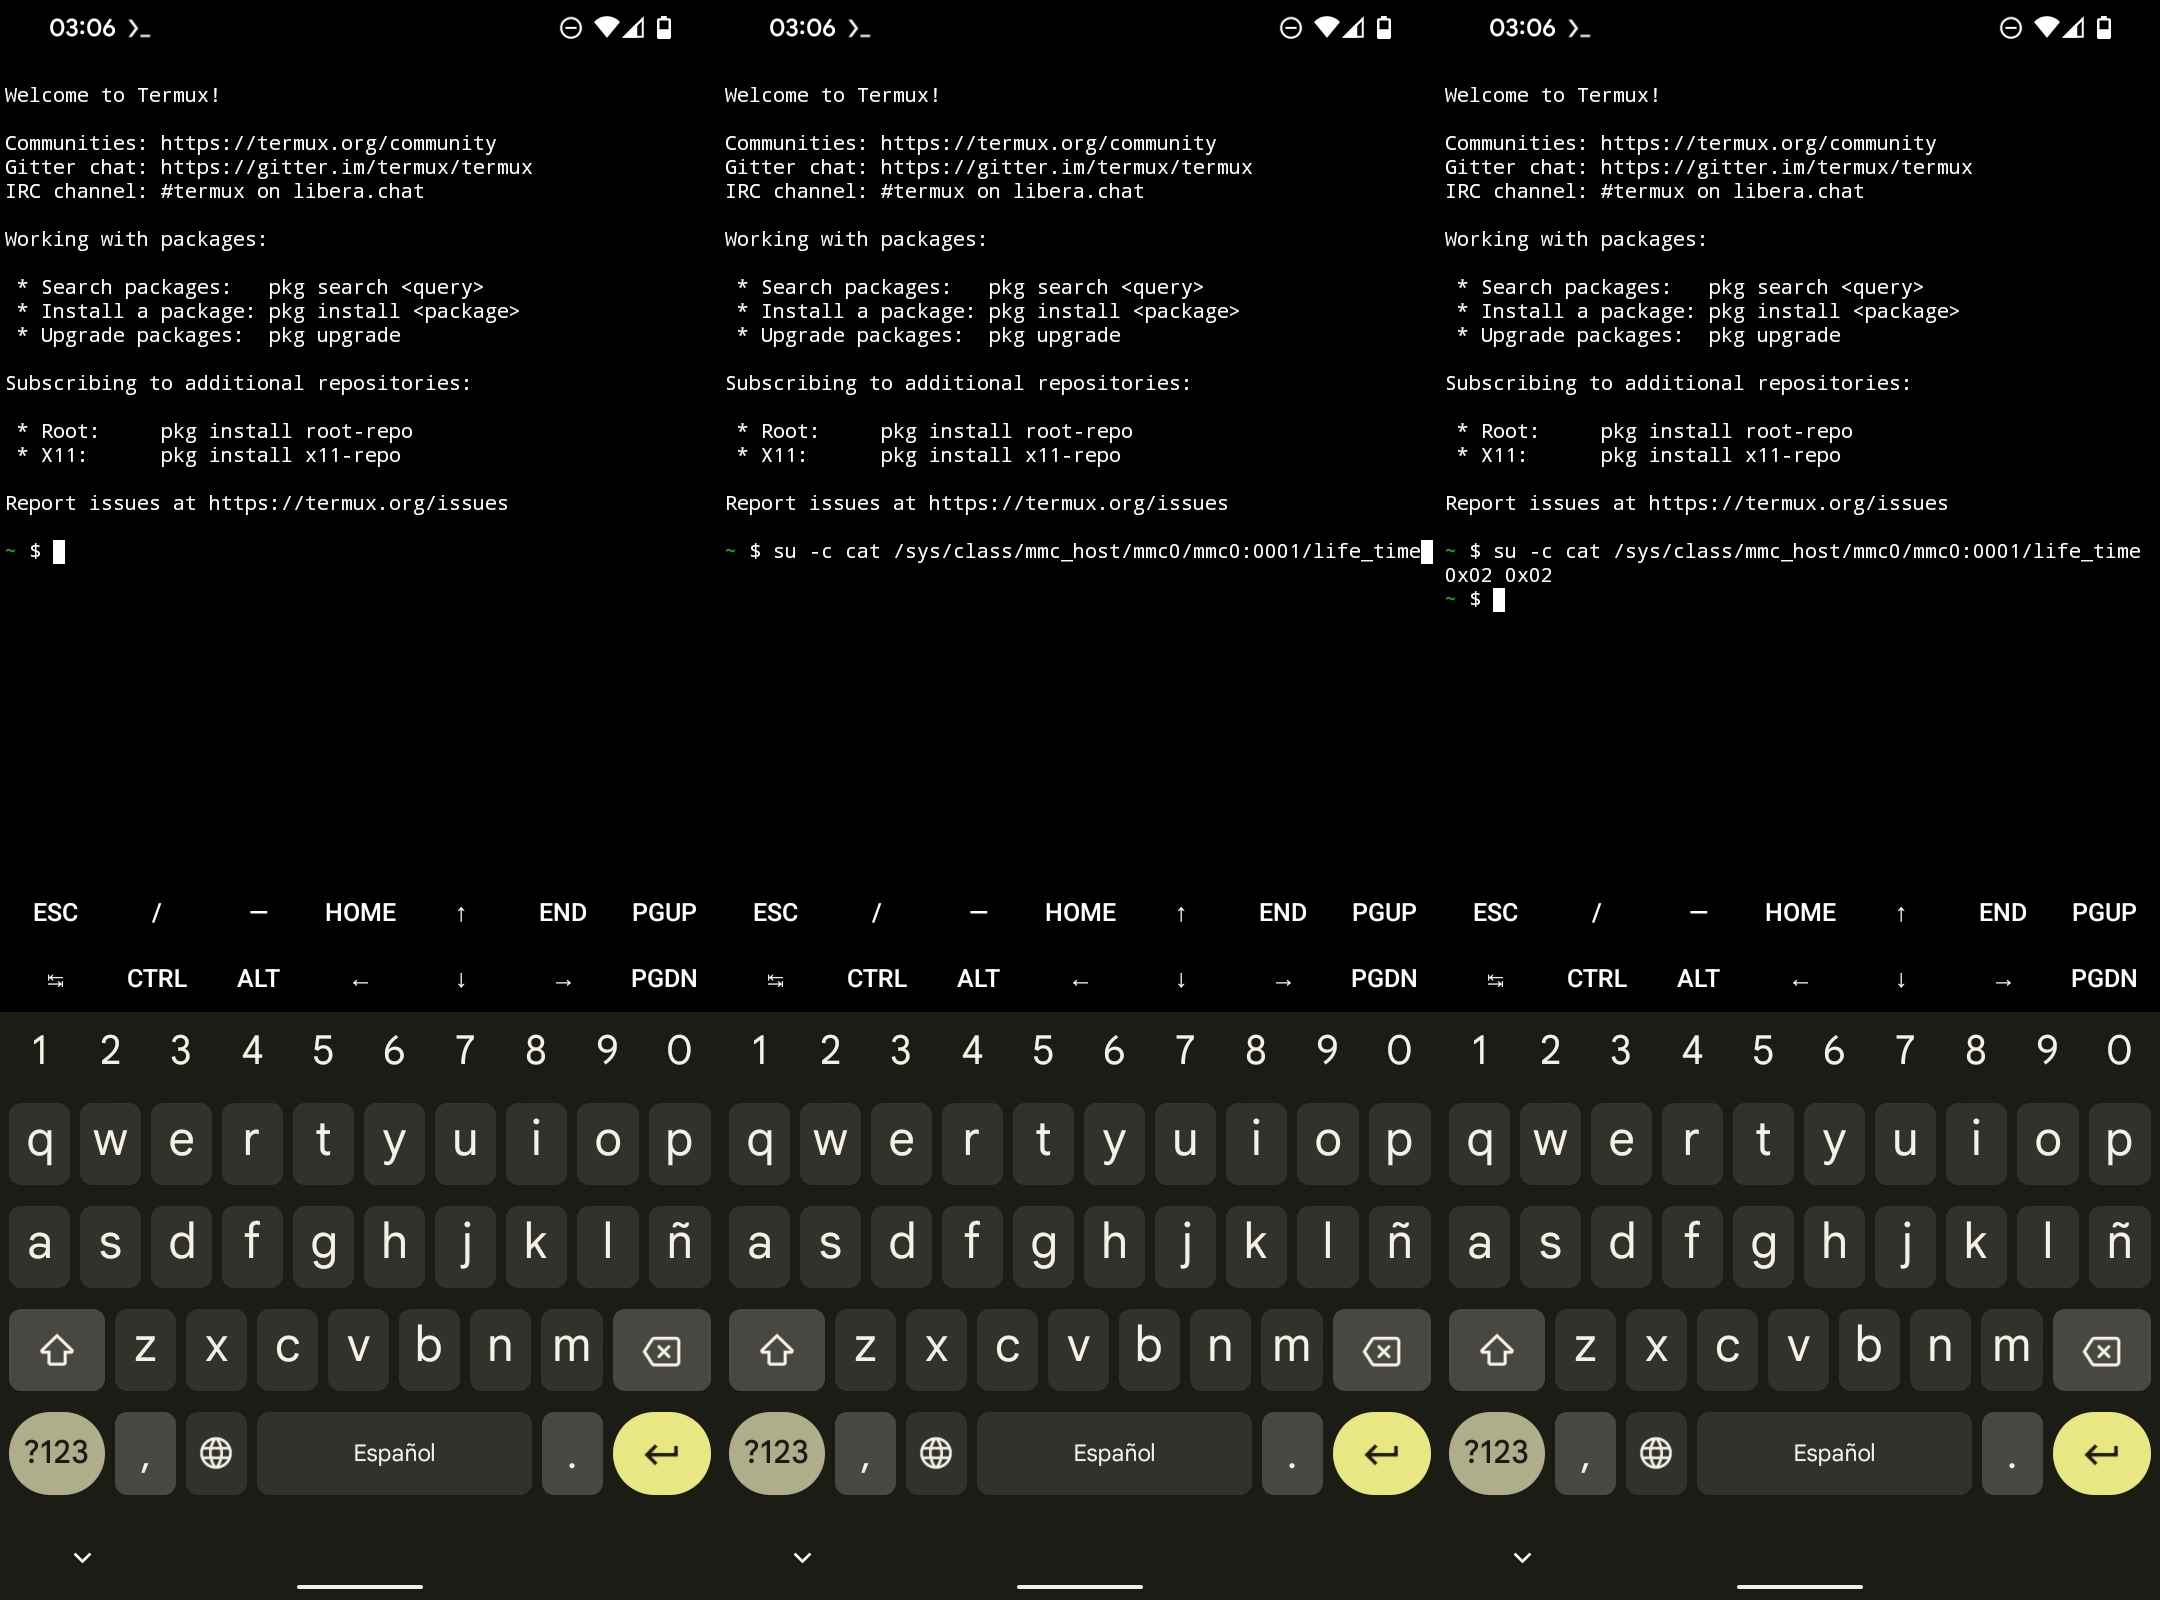
Visual representation of the tip
To solve the problem of SMS not arriving, simply go to "Settings/Phh Treble Settings/IMS features" and select the option "Install IMS APK for Qualcomm vendor", then wait for the apk to install (a warning banner will pop up) and reboot the device.
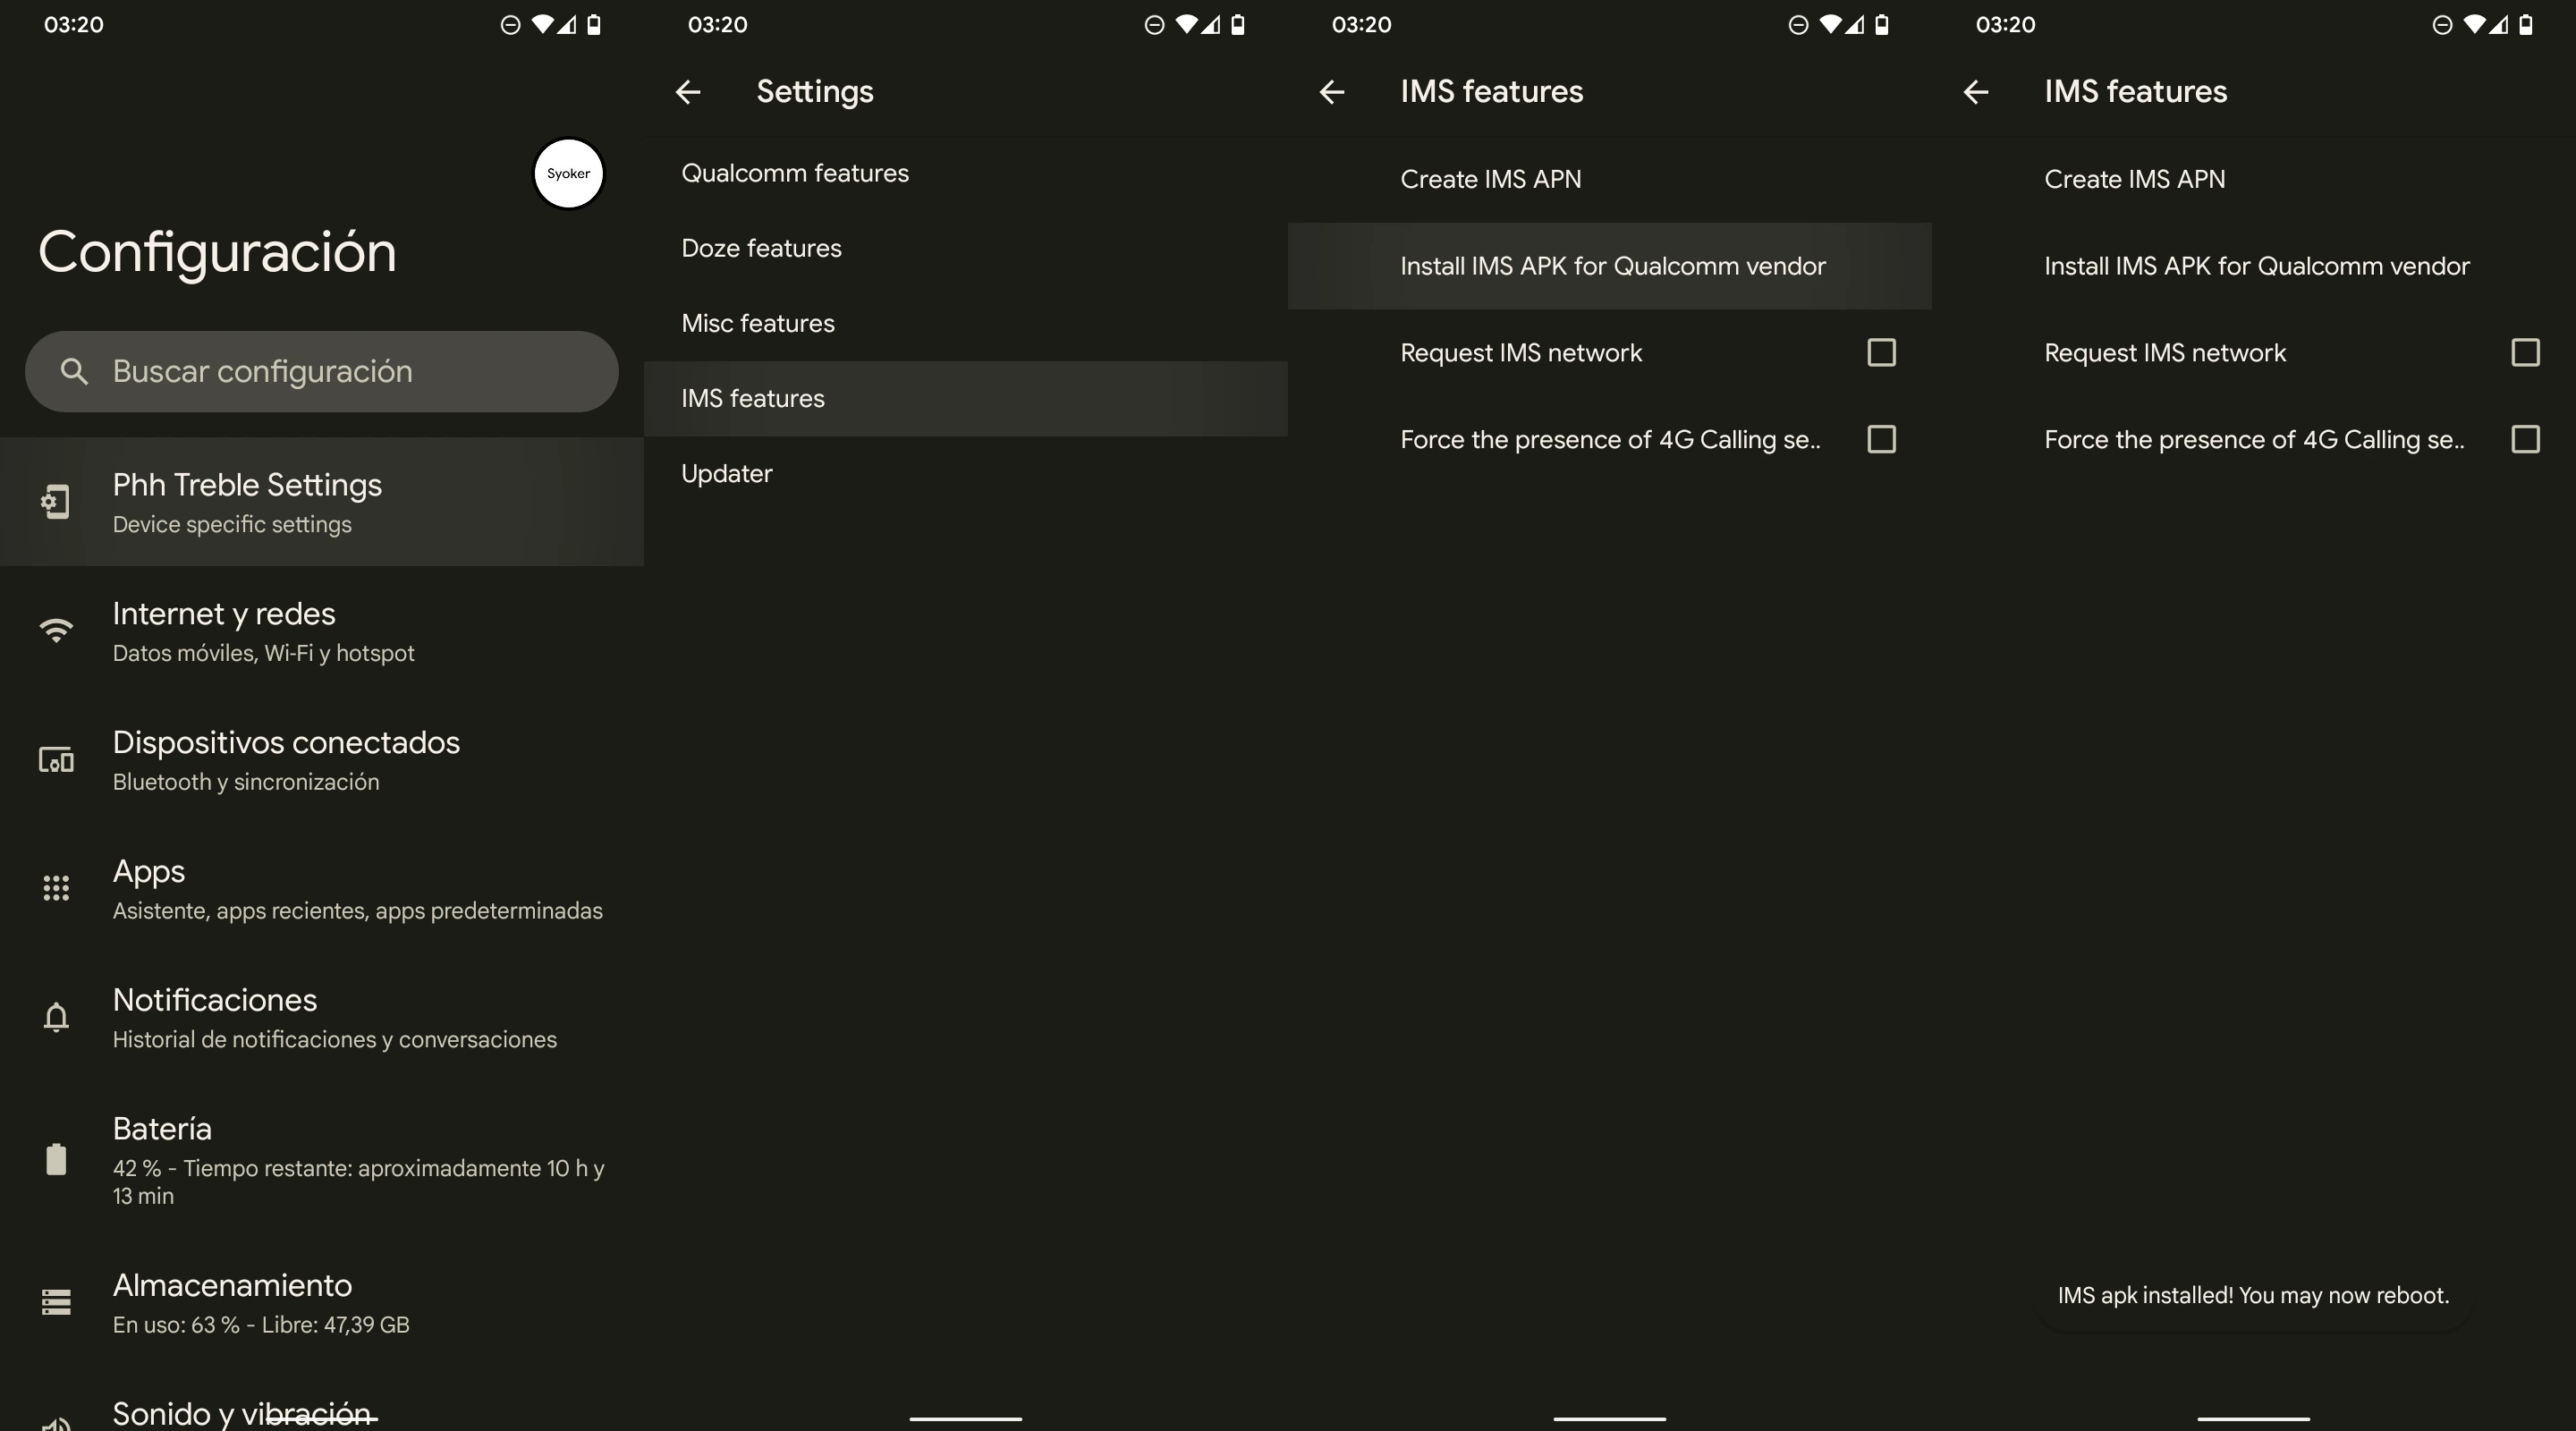
Visual representation of the tip
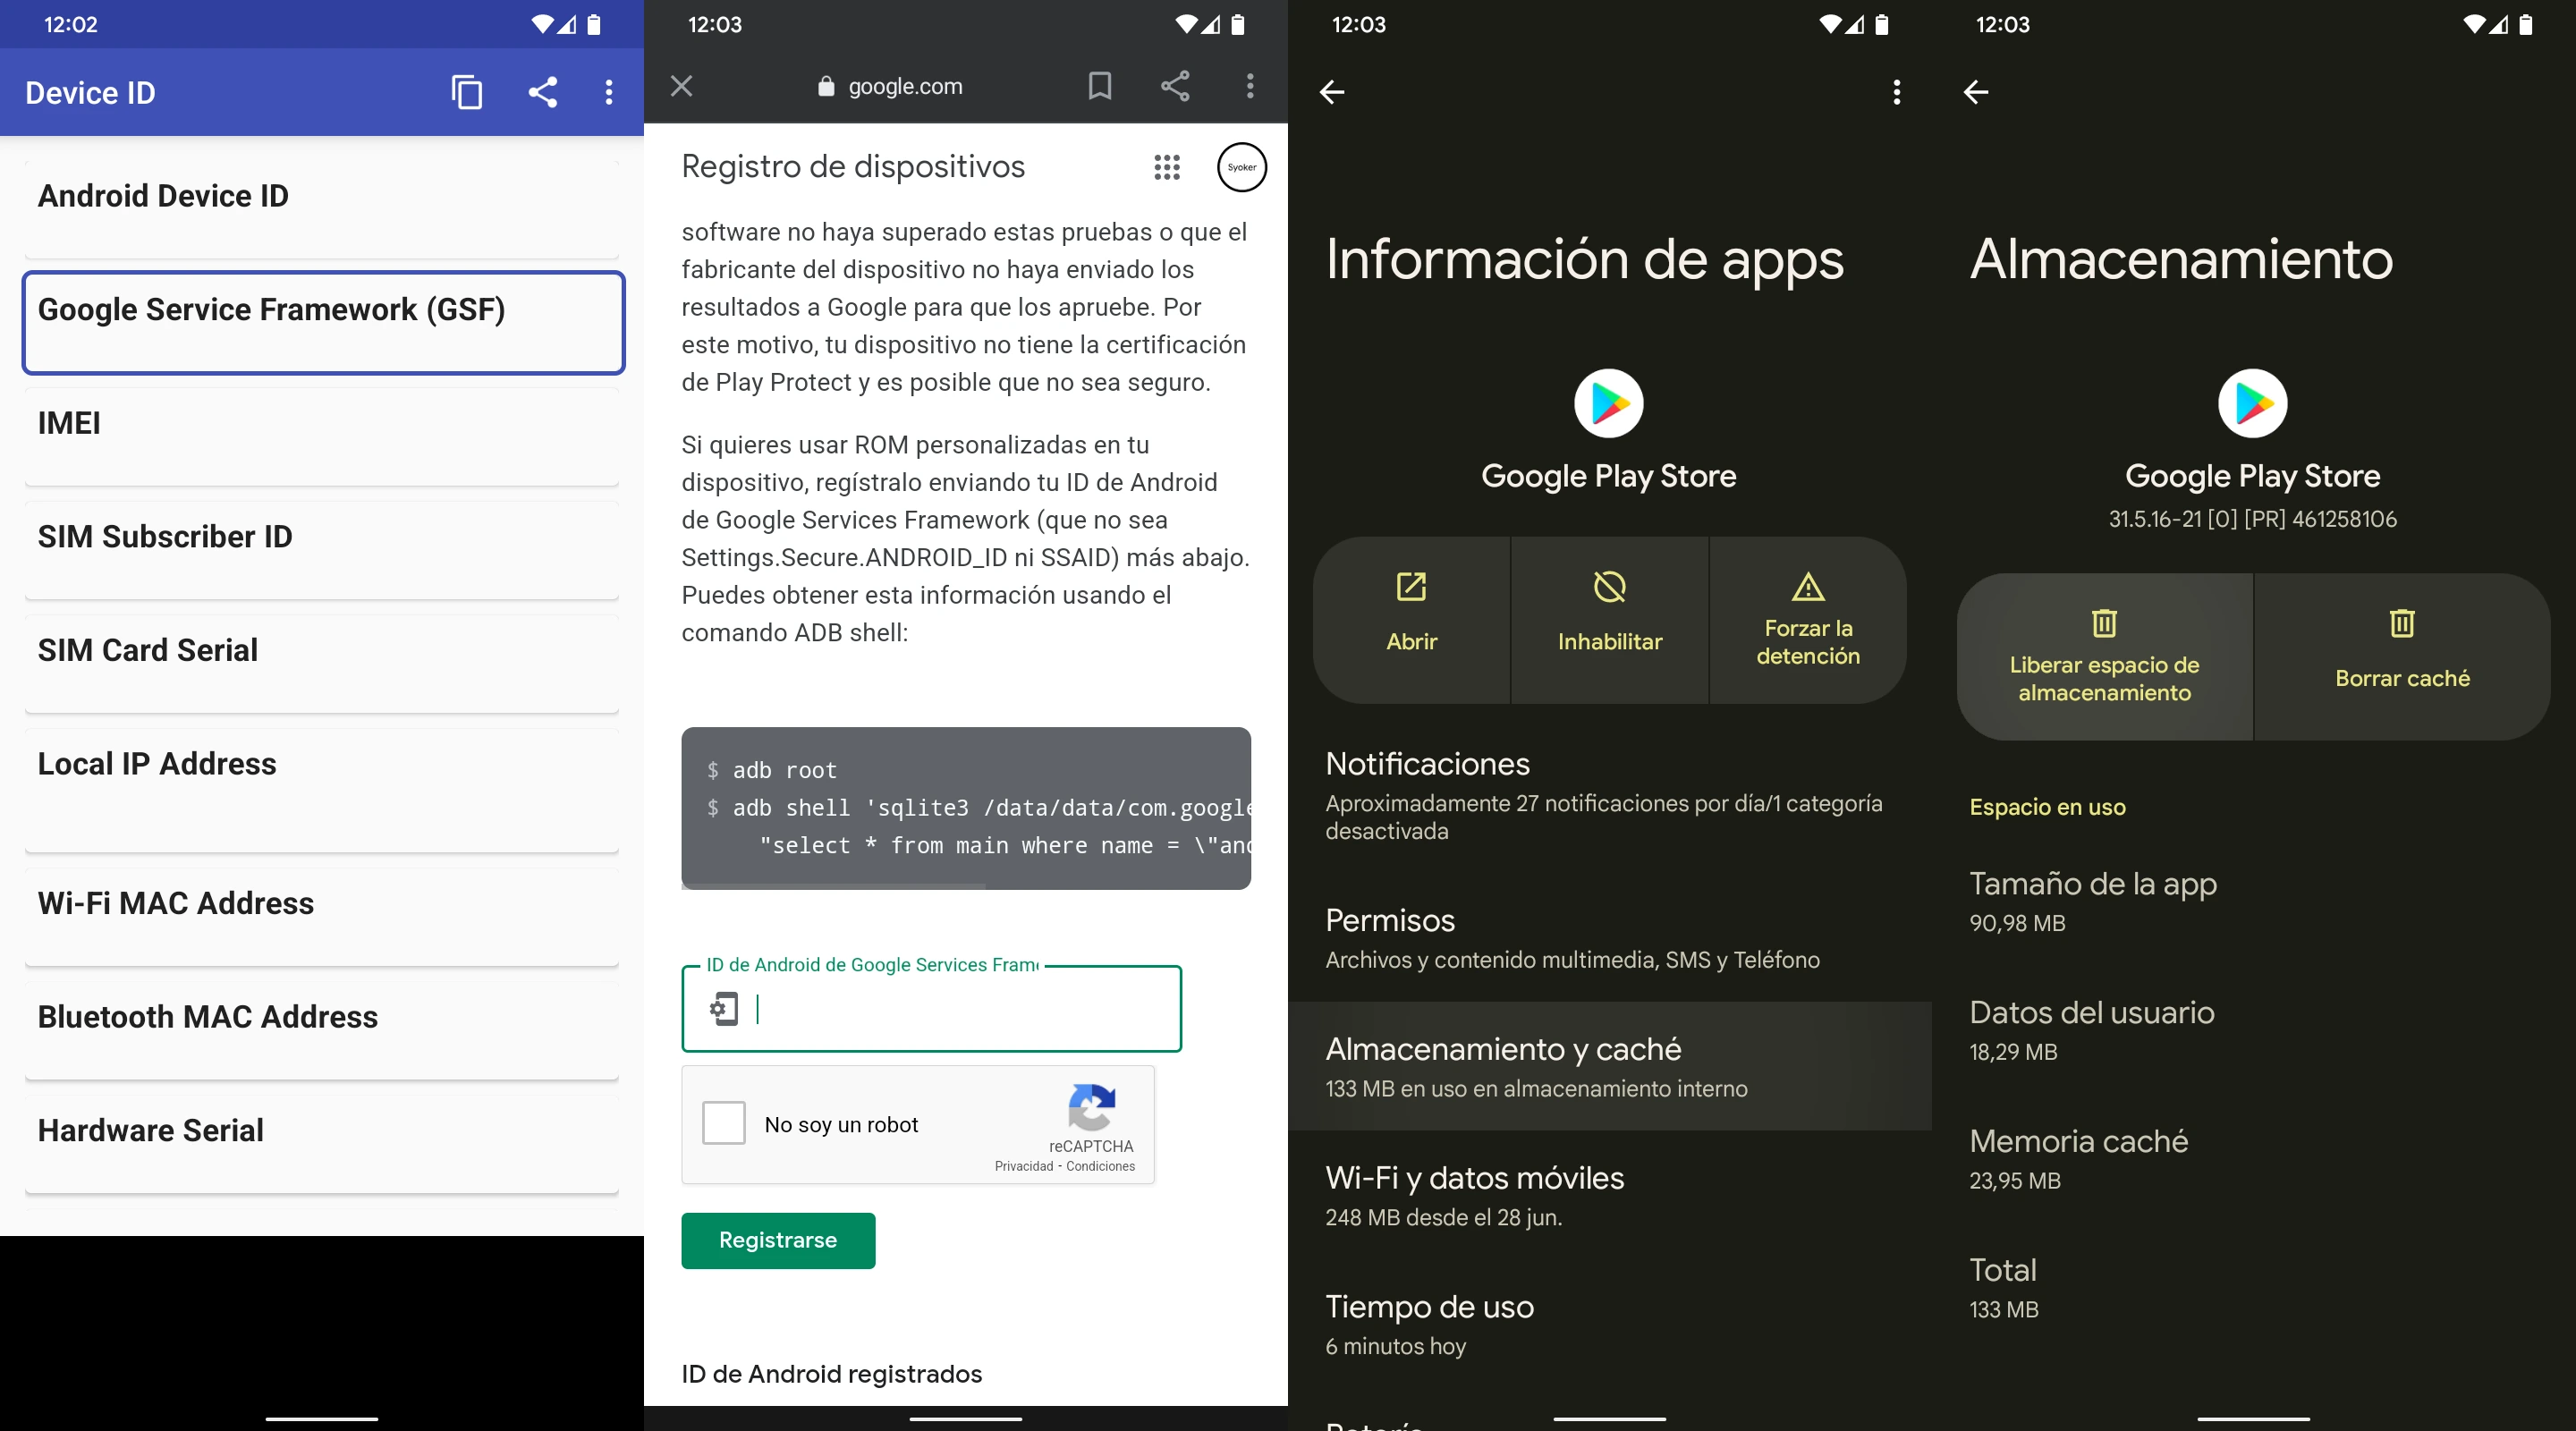
If you have the Play Store certification issue (you will notice when you get a notification saying "This device is not certified") what you need to do is install the Device ID app, inside the app copy the GSF ID (Google Service Framework ID), with that ID, register it on Google here (paste your ID in the only text entry place on the page and tap the "Register" button), then restart the phone and clear the Google Play Store data under "App Info/Storage and Cache/Free up storage space" and you're done (it takes a while to apply).
Visual representation of the tip
If you have any questions, please visit the Telegram group in Spanish (currently doesn't exist in English) of our device Motorola One Fusion | Español™ (If you find any translation errors, let me know via GitHub Issues).